Holiday Production Primer 2025
Your guide to crushing the busiest – and most profitable – season of the year
The holidays are when stress goes up, timelines get tight, and client expectations get even tighter – but that doesn’t mean your blood pressure has to spike. MOQ1 was built for this moment. We’ve been doing on-demand fulfillment at scale for over 20 years, and every year we level up to make sure you can say “yes” to every opportunity from now through Christmas.
This is your official holiday production primer: what to expect, what we’re doing behind the scenes, and how to set yourself (and your clients) up for a wildly successful season – including the “13th Month” effect, where sales surge well into December.
The 13th Month Is Real — and It’s Big
Last year, we saw a 66% increase in sales during the first 3 weeks of December compared to the final 3 weeks of November.
The second week of December was our biggest week of the entire year.
Translation: There is major revenue sitting on the table for distributors who stay active through mid-December.
1) Production Expectations
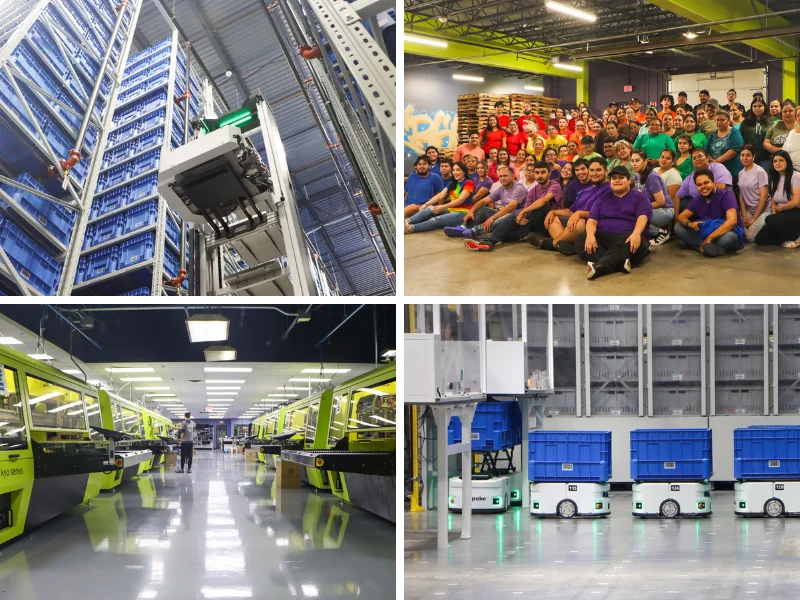
We’re fully scaled and ready for your volume – no matter how big it gets.
- 24/7 production, 7 days a week
- Staffing increased specifically for holiday demand
- Additional machines brought online throughout the year
- Highly automated workflows designed to absorb volume surges
- Robots are ready to go
Lead Times
We’ll post weekly lead-time updates for key product categories through Christmas.
Last year’s average production time (across all orders in November and December): 1.5 days, peaking at 2 days in mid-December. That’s on-demand printing at true enterprise scale.
Stock & Inventory
No need to worry – we don’t run seasonal warehouse guessing games.
Our catalog products are in-stock and ready for fast production.
We’ve also expanded reserves on high-velocity products so you can keep selling with confidence.
2) Shipping & Carrier Expectations
A friendly (and important) reminder: shipping time is separate from production time.
Expedited shipping speeds up transit, not printing.
To help your buyers, we’ll automatically display banners with recommended ordering dates in every shop so customers know when to order for Christmas delivery.
Carrier Timing (U.S.)
- Economy: 2–8 business days
- Ground: 1–6 business days depending on proximity (see map below)
- 2-Day Air: 2 business days
- Overnight: 1 business day
Full shipping details here: https://1300help.com/shipping

3) Holiday Selling Recommendations
- Set expectations early and clearly.
Your best holiday season is the one with no surprises. Remind clients that carriers get unpredictable — even with the best planning. - You can safely sell into mid-December.
Because our production is fast and on-demand, you don’t have to shut down early like bulk-based programs. - Watch the shipping calendar more than the production calendar.
The closer we get to Christmas, the more important it is to upgrade shipping. - Remind clients: once it leaves the facility, it’s in carrier hands.
We will always hit our production windows — but shipping delays are industry-wide and unavoidable some years. - Show off your speed.
Fast, no-minimum on-demand production is a selling edge. Use it. Brag with screenshots. Tell your clients they can order late and still win.
4) What’s Next
Over the next few weeks, we’ll continue posting:
- Updated lead-time reports
- Shipping updates
- Production insights
- Reminders as we approach peak season
You’ll also start seeing banners inside your shops with recommended order dates to help your customers stay informed.
Go Make the Most of the 13th Month!
This is the season when MOQ1 users separate themselves from everyone still stuck in bulk-order land. With no inventory, no cutoffs, and 1–2 day production, you’re in the rare position of being able to say yes when everyone else has to say no.
The orders are out there. The buyers are spending. The clock is ticking — but we’re ready.
Let’s make this your biggest December yet.


-1.png?width=670&height=196&name=Sales%20by%20Payable%20(2)-1.png)