🎁 Sign up today to receive a $50 product sample credit – limit one per company. Create your account!

How to use Advanced Design Options for Design Configuration

After uploading your design, our Advanced Design Options allow you to:

  • Exclude a design from your shop
  • Exclude it from being displayed on certain product colors
  • Exclude it from availability in certain print locations

You cannot change the color of a design, increase its resolution, or resize it within the platform. Please ensure your design is the correct specifications for print prior to upload.

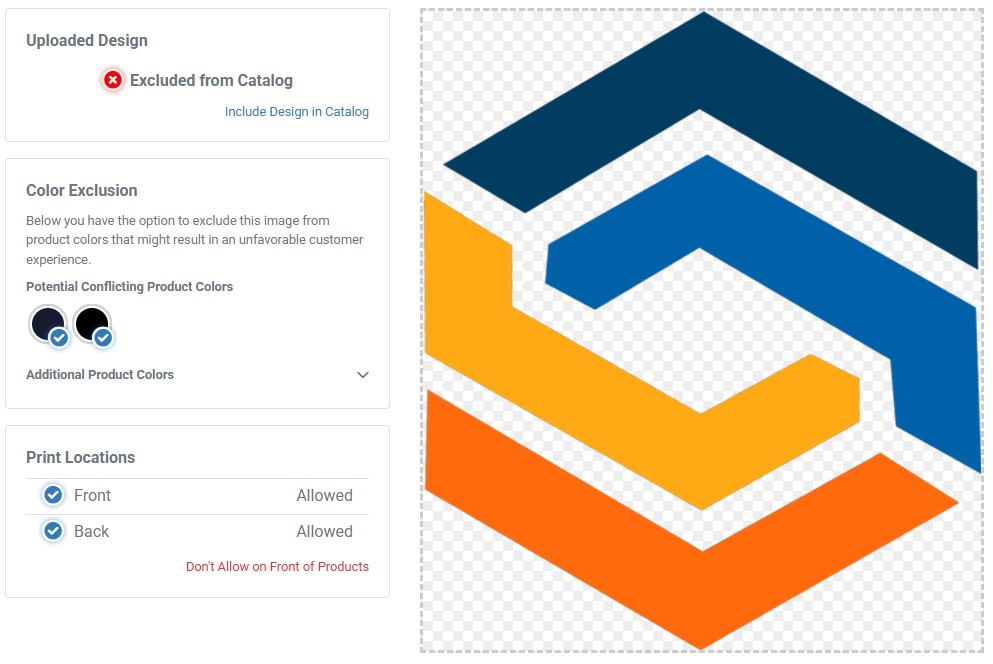
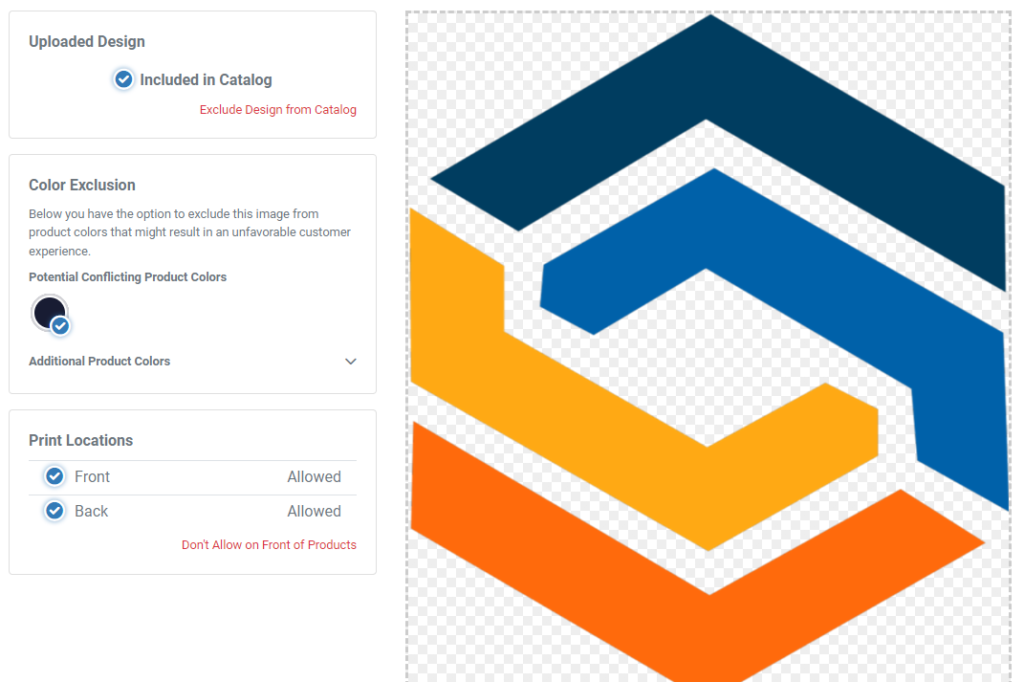
To access Advanced Design Options, either check the Advanced Design Options checkbox when uploading your design or click on the design from within your Design Library. This will bring you to the Design Configuration page.

Excluding a Design from Your Catalog

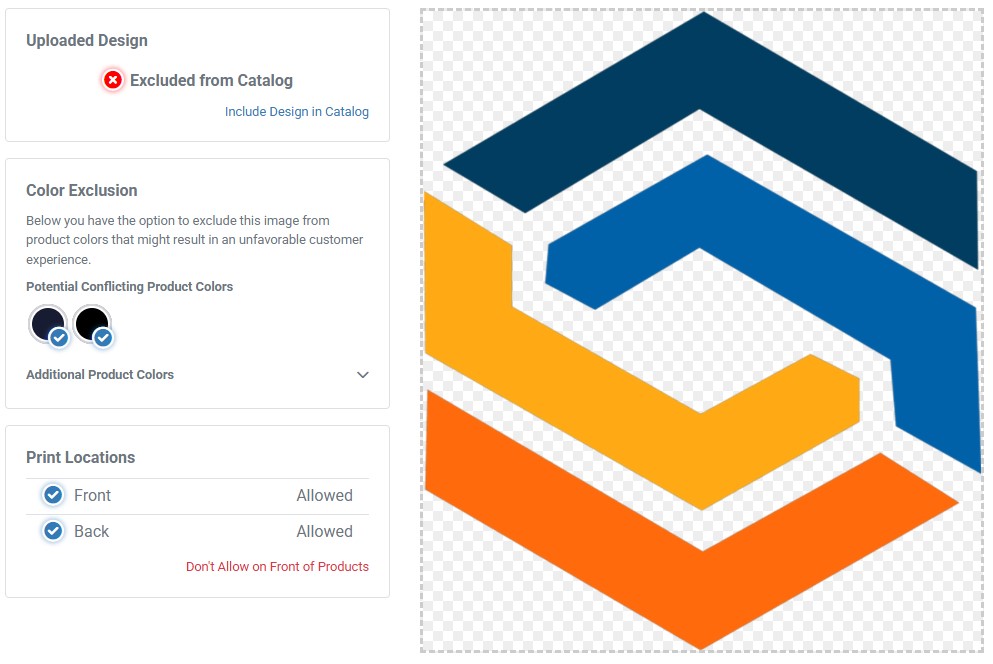
Excluding a design from your catalog will ensure that design is not displayed in your shop. The design will be saved in your Design Library in case you’d like to include it in the future. 

Exclude Design

Excluded designs, while not available to your customers automatically, can still be used to create Featured Products. For more information on creating a Featured Product, please review our tutorial here.


Excluding a Design from Displaying on Certain Product Colors

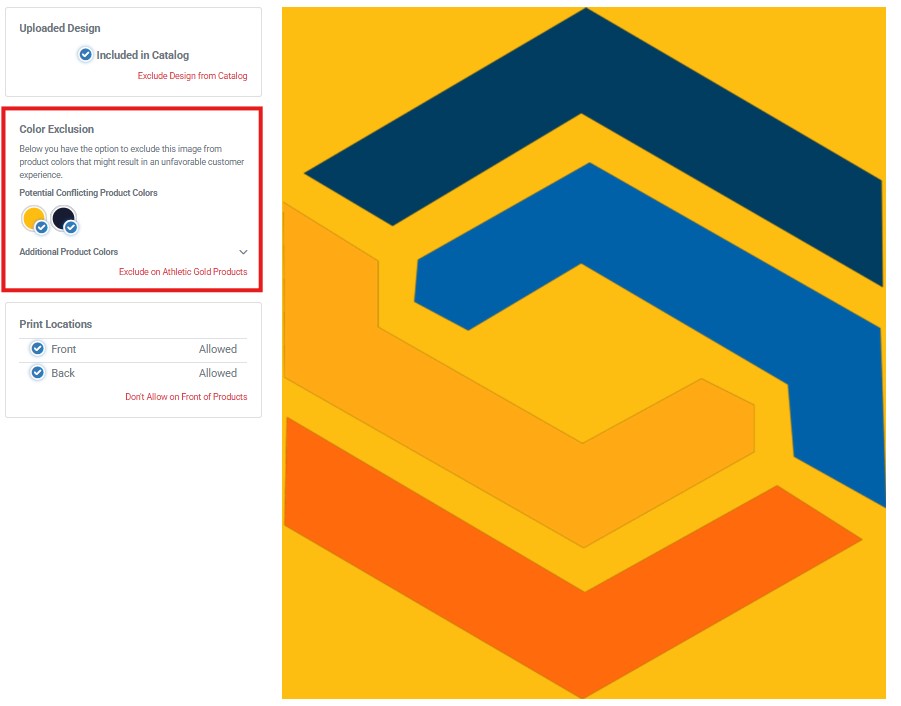
Our system allows you to exclude your design from displaying on certain product colors within your shop. This ensures that you can include white products without displaying your white designs on them, for example. 

Please note: if you choose to exclude your design from any product colors you currently have selected as your shop colors, you’ll want to be sure to either add another design to display on  those product colors OR remove that color as a Shop Color in your settings.

We will automatically display any shop colors that may potentially conflict with your logo for your review. To preview your design on that color, click on it from your Design Configuration screen. If you’d like to exclude it, click the red  “Exclude on Athletic Gold Products” link below the color swatch.

Excluding a Design from Displaying in Certain Print Locations

If you’d like to ensure your design is not displayed on the front of back of garments, you can do so here. Click “Front,” then “Don’t allow on Front of Products” to exclude the design from being displayed on the front of garments in your shop. Conversely, you can do the same for Back Print locations.
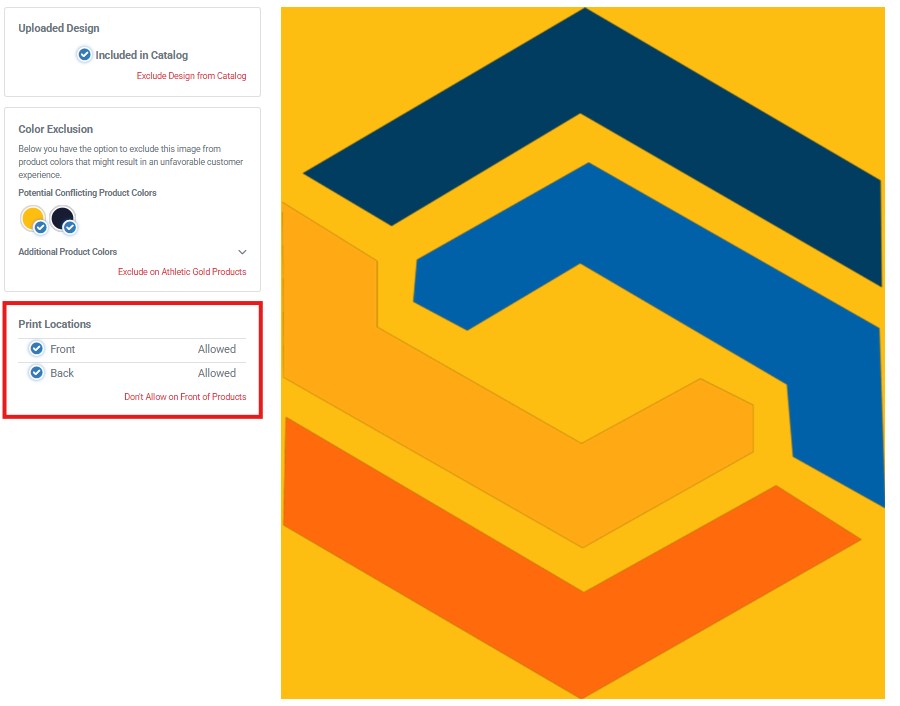
Please note: at least one print location must be allowed for each design.

How to Manage Your Designs

The designs activated in your shop will automatically appear on every item in your catalog so customers can easily find their preferred product & design combination.

You can view all the designs you’ve uploaded to your shop at any time by clicking Designs in the left navigation menu. You’ll notice Design Filters in the top left of your Design Library indicating that designs are organized by Included and Excluded designs. 

Included Designs are those that are currently available in your shop, while Excluded Designs are those you have uploaded that are not active in your shop.


Adding New Designs to Your Shop

To add a new design to your shop, click Upload Design in the top right corner of your Design Library. 

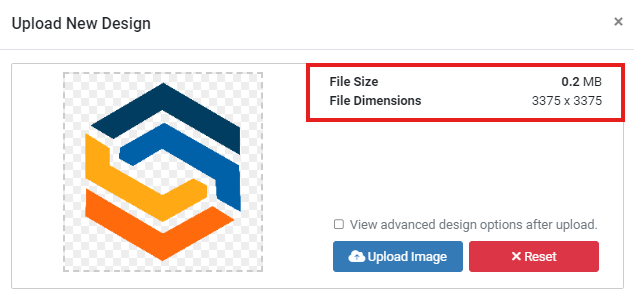
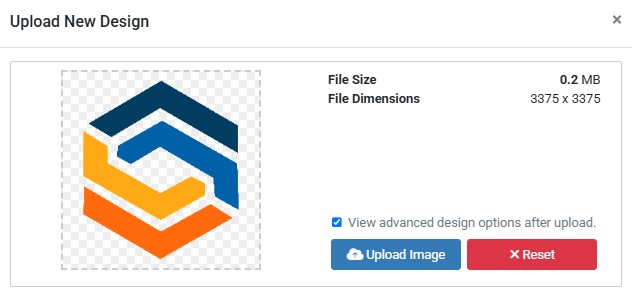
After selecting your design from your device, you’ll see file information such as file size and dimensions. After confirming the file specs are large enough for print, click Upload Image. 

Your shop will be dynamically updated to include your most recent design immediately.


Advanced Design Options

To access Advanced Design Options, either check the Advanced Design Options checkbox when uploading your design or click on the design from within your Design Library. Our Advanced Design Options allow you to:

  • Exclude a design from your shop
  • Exclude it from being displayed on certain product colors
  • Exclude it from availability in certain print locations

Please note: if you choose to exclude your design from any product colors you currently have selected as your shop colors, you’ll want to be sure to either add another design to display on  those product colors OR remove that color as a Shop Color in your settings.

For more detailed instructions on Adding a Custom Design to Your Shop, check out our detailed tutorial on that subject.


Editing Existing Designs in Your Shop

If you’d like to deactivate a logo you have active in your shop, exclude that logo from being displayed on certain product colors, or ensure it’s not available in certain print locations, you can enter the Advanced Design Options for that design by clicking on it in your Design Library. 

To view your shop’s active designs, be sure to filter to Included designs. If you’d like to edit an active design in any of the ways noted above, click on it to open Design Configuration for that design. 

From here, you can Exclude the design from your shop (which will remove it from your storefront), exclude it from being displayed on certain product colors, or exclude it from availability in certain print locations. 

Please note: if you choose to exclude your design from any product colors you currently have selected as your shop colors, you’ll want to be sure to

  • a) add another design to display on those garment colors,
  • b) remove that color as a Shop Color in your settings, or
  • c) exclude that color products from your shop from within your Product Manager.

If you are seeing blank products displayed in your storefront, it’s because you have an active Shop Color with no designs with permission to display on it.

If you’re looking for more information on Including Template Designs or Configuring Templates in Your Shop, please check out our detailed tutorials on those subjects.

How to Design for Digital Printing

When uploading artwork for print, it’s vital to ensure your file is formatted to print well. That means ensuring that the colors used in your design are safe to print and the physical dimensions (length and width) of the logo itself as well as the resolution (clarity) are large enough to print clearly at our standard print sizes. 

The system will NOT inspect your logo after uploading it. If your design has poor resolution or a solid colored background, it will display and print that way on products your customers purchase. 


Artwork Specifications

  • Dimensions: 11 inches x 13 inches
  • Resolution: 300 dots per inch
  • File Type: PNG image with a transparent background OR vector image
  • Colors: sRGB color profile

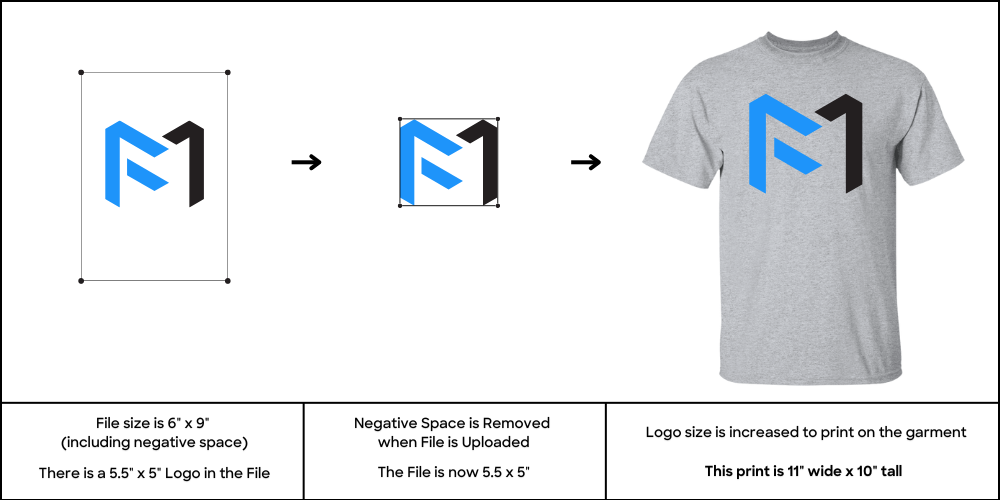
The dimensions of your file are determined by the tallest & widest points in your design that include pixels (or dots of color). We will remove all negative space in your design when it’s uploaded to our platform as demonstrated in the examples below.

Regardless of the dimensions of your file, your artwork will be scaled to fit the standard print dimensions for the specific garment type & size that’s ordered. For best print results, make sure your design is 11 inches wide and/or 13 inches tall so it can be printed on all products effectively. We will automatically scale your artwork down to fit products with smaller print sizes.

For tips specific to designing for our proprietary DIGISOFTŽ print technology, please review our detailed design specifications here.


Default Print Sizes by Product:

  • Adult Shirt Default: 11 x 13 inches (on size Large)
  • Youth Shirt Default: 9 x 11 inches (on size X-Large)
  • Adult Hoodie Default: 11 x 11 inches (on size Large)
  • Youth Hoodie Default: 10 x 10 inches (on size X-Large)
  • Left Chest (also shorts, pants, bags): 4 x 3.5 inches (on size Large)
  • Tote Bags Default: 11.41 x 13 inches

We take care of image sizing for you, scaling your artwork to ensure your print size is proportional to the placement on your mockup regardless of garment size. The dimensions above represent the standard print size on Men’s/Unisex size Large garments and Ladies’/Youth size XL as indicated). 


High vs. Low Resolution Images

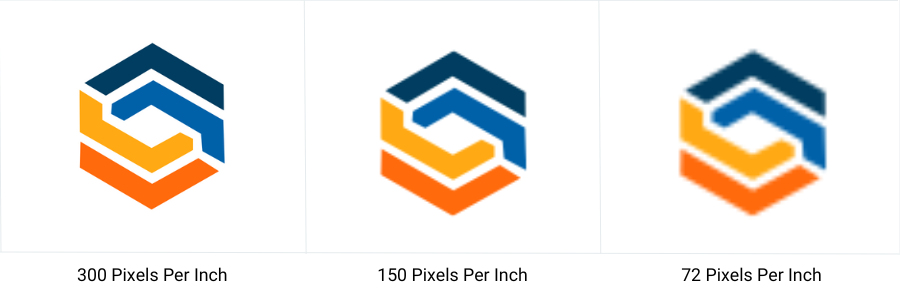
If your logo is smaller than the size it’s going to print, it will have lower resolution. Lower resolution files will look less crisp on the garment when printed. Check out our examples below of what a high resolution file (300 pixels per inch) looks like as compared to a low resolution file (72 pixels per inch) when they’re the same dimensions.


Print Size Scenarios:

In the first example, a file is uploaded that is smaller than the print size for a t-shirt. The negative space within the file is removed when the file is uploaded to the platform, which reduces the overall file size to match the size of the logo within it. When the design is printed, it’s enlarged to fill the print space for the t-shirt. If your logo is too small,  it may cause the edges of your print to be less crisp when it’s enlarged for print. 

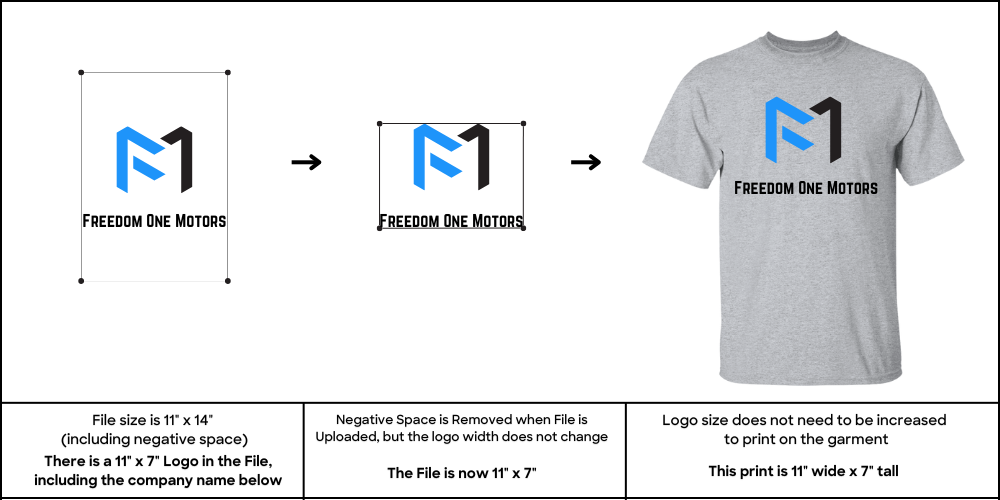
In the next example, the same logo size is used, but with the addition of full-width text below the logo. This text matches the full print width of 11”, which will ensure the logo size remains fixed & no scaling is required.

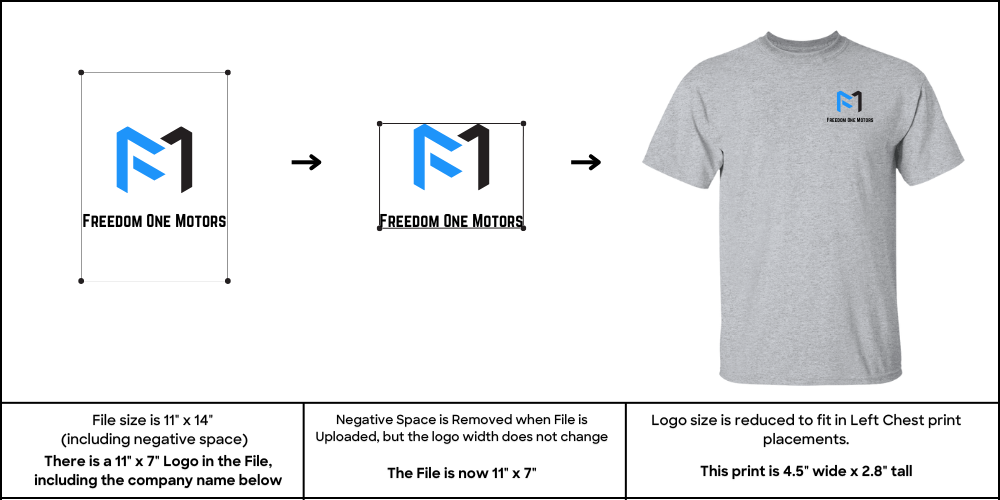
In our final example, we can see how the logo from above is resized to fit a Left Chest print placement. Because this artwork is wider than it is tall, we reach the maximum Left Chest print width of 4.5” on size Large. In order to maintain the design’s original shape, it prints at 2.8” tall.

How to Add a Custom Design to Your Shop

Uploading custom designs is key to customize the products that are offered in your online shop. 

The designs you upload are automatically made available on every item in your catalog so customers can easily order the exact product and design combination they’re looking for.

Before uploading artwork for print, it’s vital to ensure your file is formatted to print well. Be sure to review our print specifications here for more detailed information on how to ensure your design will translate well to print.


Adding a Design:

To upload a custom design, select your shop from My Shops, then click Designs in the left navigation menu. Next, click the Upload Design button in the top right to open the uploader. If you have not yet uploaded any designs, the uploader will appear automatically.

Select your custom design from your device and click Upload Image.

By default, your design will be included in your shop when you upload them. Once you upload, your design will automatically be displayed on the items in your shop and available for your customers to purchase.

If you’d prefer for your design to be excluded by default, click the “View advanced design options after upload” checkbox in the uploader.

If your design will only be used on Featured Products, you can exclude it from your design catalog so that it isn’t available across your store on all products. It will remain available for you to select in the creation of your featured product. 


Excluding Product Colors:

From the advanced design configuration screen, you can exclude the design from being displayed on specific product colors by selecting them in the Color Exclusion section of design configuration.

The system will call out any potential conflicts it identifies between your selected shop colors and the colors used in your logo. For example, if your design is black and you’ve selected black as a shop color, we’ll let you know you may want to exclude it from being offered on black garments.

Click on the color you’d like to exclude your design from, then click the corresponding Exclude Color link at the bottom of the color selection area. Continue this process until all excluded colors display a red X.

Please note that you do not need to exclude any design from product colors that are not offered in your shop. Additionally, excluding a product color will exclude your design from being displayed on that product color within your shop feed. Your customers can still select any combination of included designs and product variants for purchase.


Excluding Print Locations:

By default, your customers will automatically have the option to select this design on either the front or back of any garment in your catalog. If you’d like, you can also exclude a design from being offered in specific print locations (front or back). 

Once your selections are complete, click Save Changes at the bottom right of the window to return to your Design Library.

Note: if you do not see your uploaded design when you return to your shop’s Design Library, you may not have included it. Change the status filter to ‘excluded’ to view your design(s), place a check in the top left corner of the design box, then click Include Selected Designs to activate them.

Sign Up for MOQ1

MOQ1 is for promo product dealers, decorators, and distributors only. 

Enterprise Contact Form

To learn more about our Enterprise Platform, please provide some additional information about your business. Our team will reach out to discuss next steps in 1-2 Business Days.

Claim your
$50 sample credit!

To help show you how fast and easy MOQ1 really is, we’re offering a $50 credit you can use towards a sample product. Create your account to claim yours!

Available for a limited time. Limit one per company.Â